How to Replace a Humidifier Filter?
A humidifier can soften dry air, but its filter does not last forever. In an evaporative model, the wick captures minerals as water moves through it. Over time, deposits can stiffen the material, reduce airflow, and leave a musty smell near the unit. That is when humidifier filter replacement becomes more than routine upkeep.
Room moisture matters, too. The U.S. Environmental Protection Agency advises keeping indoor relative humidity between 30% and 50%, and below 60% when possible (EPA, A Brief Guide to Mold, Moisture and Your Home). A clean filter cannot control humidity by itself, but it helps the humidifier operate as designed. Small detail. Real difference. Replacement timing varies by model, water hardness, and daily use, so a universal schedule would be misleading. Check the owner’s manual for the recommended interval and filter type. Before you begin, unplug the unit, empty the tank, and place the base on a towel. Photographing the old filter can help you match its orientation. If it feels rigid, looks heavily scaled, or smells unpleasant after cleaning, replacement may be due. I used to focus only on the calendar; that is not always enough. The steps ahead explain how to remove the old filter, prepare the housing, and fit a new one without forcing it.
Identify Your Humidifier Type and the Correct Filter
Before replacing a humidifier filter, identify how your unit makes moisture.
Evaporative models usually use a porous wick that absorbs water and catches minerals. Ultrasonic and impeller models often have no wick, though some use a demineralization cartridge. Warm-mist units may also have scale-control parts.
FIT MATTERS
The shapes can look similar. The wrong part may fit loosely or restrict airflow. Check the model number and filter code on the unit’s label, then confirm both in its manual. Measure the old filter only as a secondary check; similar-looking wicks can differ in thickness and density.
The U.S. Environmental Protection Agency’s Use and Care of Home Humidifiers guidance recommends cleaning portable units every third day and replacing filters according to the manufacturer’s instructions. Its indoor humidity guidance recommends keeping relative humidity around 30–50%, and below 60%, to reduce moisture problems. A small hygrometer near the room’s center can help you check conditions.
I used to assume a darker wick simply needed replacing; mineral deposits can cause discoloration, but the manual’s schedule is a better guide.
Gather Supplies and Unplug the Humidifier
How to Replace a Humidifier Filter?
Before opening the humidifier, gather the replacement filter, a clean towel, and a small bowl for drips. Check the unit’s manual or filter compartment to confirm the correct size and orientation. Filters can look similar but fit differently. Unplug the humidifier from the wall, not just from a power strip’s switch. If the unit has been running, let it cool and empty its water tank before handling it. A little patience here matters.
Tips: Keep the plug and cord away from water. Set the filter on a dry surface, and avoid touching electrical parts with damp hands. Take a quick photo of the old filter’s position if the layout seems confusing.
Once the humidifier is unplugged, open its cover gently and locate the filter without forcing any clips. If the housing feels stuck, pause and check the instructions; pushing harder can crack plastic parts. Notice which side faces up, then compare the old filter with the new one. I sometimes find this step easy to rush, but a filter seated backward may not work as intended. Keep the towel nearby for stray drops, and leave the unit unplugged while you prepare for the replacement.
Remove the Old Filter and Clean the Filter Compartment
Before replacing a humidifier filter, switch the unit off and unplug it. Empty the water tank, then place the humidifier on a towel near a sink. A little leftover water can spill when you open the housing. Check the manual for the filter’s location and removal method, since designs differ.
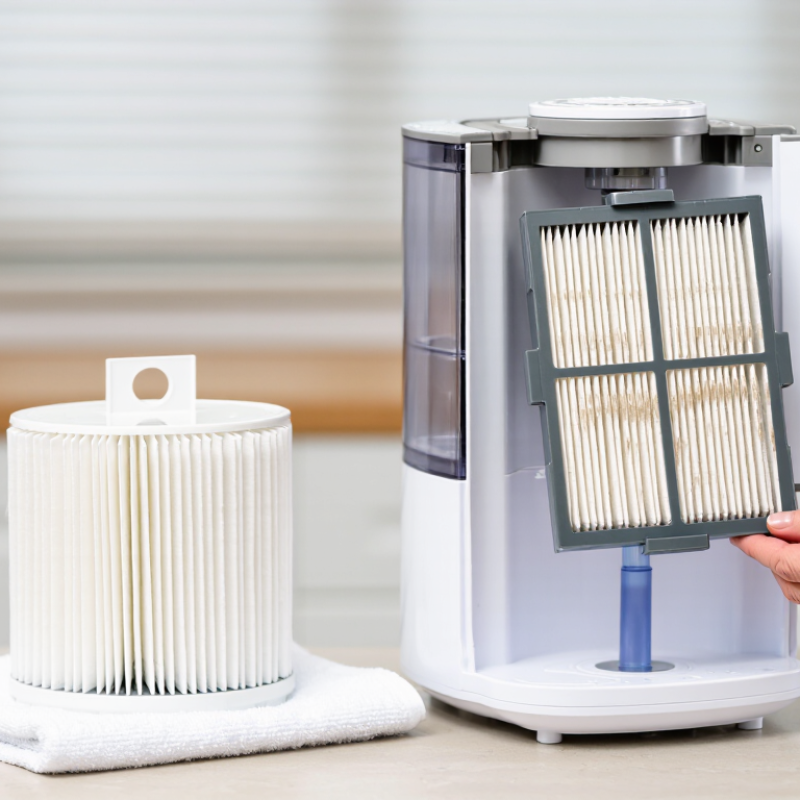
Lift out the old filter gently. Notice which side faces up and how it sits in its frame; a quick phone photo can help. If it sticks, check for a latch rather than pulling hard. Some filters are disposable, while others can be rinsed, so follow the instructions for your model. A worn or musty-smelling filter is usually ready for replacement.
Now clean the filter compartment. Wipe loose dust and mineral residue with a soft, damp cloth, paying attention to corners and the ledge beneath the filter. Avoid pouring water into the housing or using harsh cleaners, which may damage surfaces or leave residue. Dry the compartment with a clean cloth and let it air-dry briefly. It may look clean before it is fully dry; that detail is easy to overlook. Install the replacement only when the space is dry, and make sure it sits flat without being forced.
Install the New Filter and Reassemble the Humidifier
With the humidifier unplugged, remove the water tank and open the filter compartment as described in its manual. Check the old filter’s position before lifting it out; a quick phone photo can help you remember which side faces up. Compare the new filter with the old one, including its shape and any marked airflow direction. Some filters need soaking, while others must stay dry. Follow the instructions for your specific model rather than guessing.
Slide the new filter into its guides without bending or squeezing it. It should sit flat, with no corners caught beneath the frame. Take your time. A slightly crooked filter can restrict airflow or let water bypass it. Refit the cover and make sure its clips close evenly; forcing a stubborn latch is a sign to check the alignment again. Replace the tank, wipe away any drips, then plug the unit in and run it briefly on a stable, dry surface. Listen for unusual rattling and check around the base for leaks. If the filter shifts, smells unusual, or triggers a warning light, switch the humidifier off and consult its manual. Reassembly can feel finished before everything is seated properly, so one careful check is worth the extra minute.
Restart the Humidifier and Check Its Operation
After replacing the humidifier filter, seat it firmly in the holder and restore any panels or water trays. Refill the tank, then plug the unit into a dry outlet. Switch it on using a moderate setting. Listen for steady fan noise and check that mist or airflow appears after a short wait. A brief delay can be normal; persistent rattling, leaking, or a burnt smell is not. Turn the humidifier off and unplug it before checking the filter again.
Let the unit run for about 20 minutes, then inspect the area around it for drips or damp surfaces. Use a separate hygrometer to track room humidity rather than relying only on the built-in display. The U.S. Environmental Protection Agency advises keeping indoor relative humidity below 60%, ideally between 30% and 50%, to help limit mold growth. If readings climb above that range, lower the output or pause operation. One check is not enough; room conditions can shift during the day.
Tips: Confirm the filter’s orientation in the unit manual. Keep the tank level above its minimum line, and check for leaks once more after restarting. If the unit runs but produces little moisture, the filter may be seated incorrectly—or it may need time to become evenly wet.
Restart the Humidifier and Check Its Operation
After replacing the filter, restart the humidifier and monitor indoor relative humidity. The U.S. EPA recommends keeping indoor humidity between 30% and 50%.
Check that the humidifier runs normally and that room humidity stays within the recommended range.